Setting Up a New Account
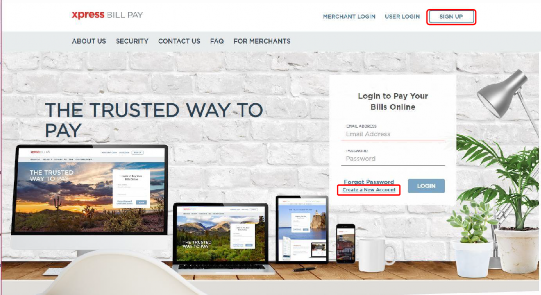
First, go to: www.xpressbillpay.com.
Make sure Private Browsing Mode is off.
The website does not work outside of the US and Canada for security reasons.
Select the Sign Up button in the upper right-hand corner of the screen, or click on Create a New Account under the login area. If you already use Xpress Bill Pay for a different organization, you do not need to create a new account. You can add additional bills to your existing account.
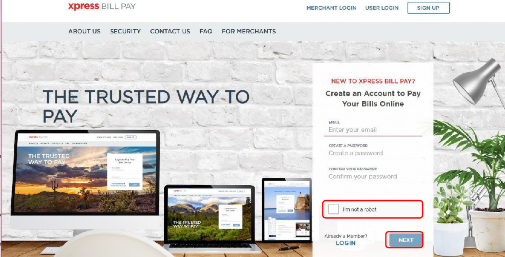
Enter a valid email address, and create a password, at least 8 characters long, contain at least 1 uppercase letter, contains at least 1 lowercase letter, contains at least 1. Enter the password again for confirmation.
Click the I’m Not a Robot box. If the Captcha test pops up, follow the instructions stated. You may need to cycle through a few sets of pictures before the system allows you to proceed.
Click Next.
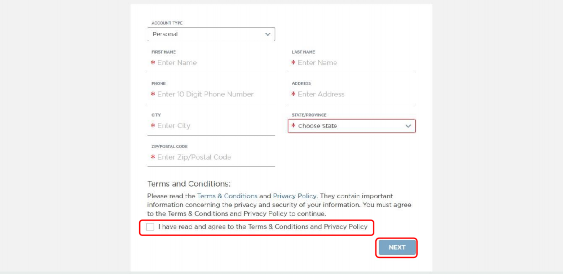
Fill out the information for your account, and check the Terms and Conditions box. Click Next.
A verification email will be sent to the email address you used to create your Xpress Bill Pay account.
If you do not receive the verification email in your inbox, make sure to check your junk or spam folder. We also recommend adding no-reply@xpressbillpay.com to your contacts or safe email list.
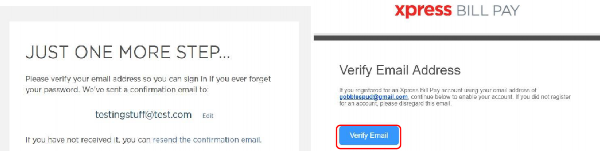
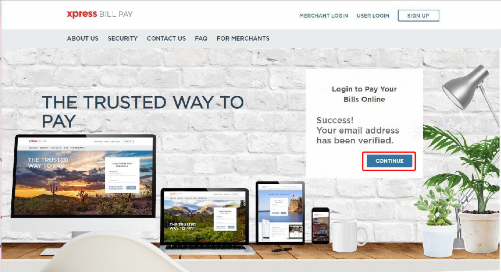
Log into your email and select the Verify Email button inside the email, which will redirect you to the login screen, where you will see a Success message. Click Continue.
Adding Your Account
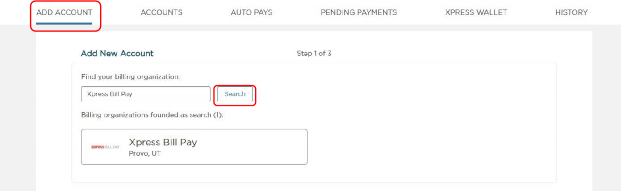
Under the Add Account option, enter your billing organization (the city or utility company your bill is from). Some organizations may be listed underneath the search box, based on your zip code. If you see your organization listed, click on it. Otherwise, enter the organization name, city, State, or zip code, and click Search. This will pull up a list of possible organizations. Click on the organization to proceed.
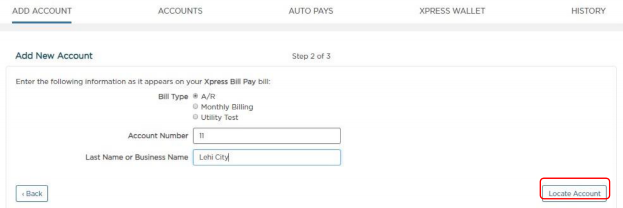
Next, you need to enter the account number and last name or business name on the bill, and click Locate Account. If you are a tenant, you may need to enter your landlord’s last name.
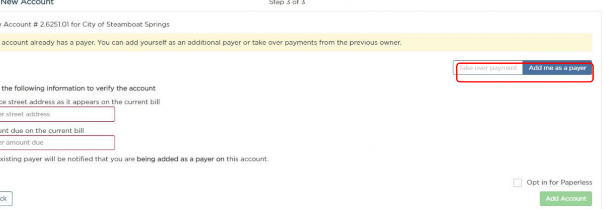
You may be asked for additional information on the bill, and to select Take over payment or Add me as a payer. This means that your account number is already linked to another online account, such as in cases of landlord/tenant accounts. Tenants should select Add me as a payer, and new owners should select Take over payment.
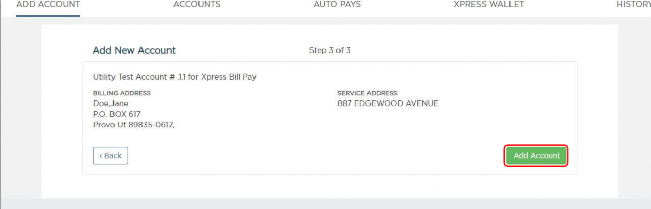
The information for the specified account will populate. If the information is correct, click the green Add Account button. This will link the bill to your account to view and pay.
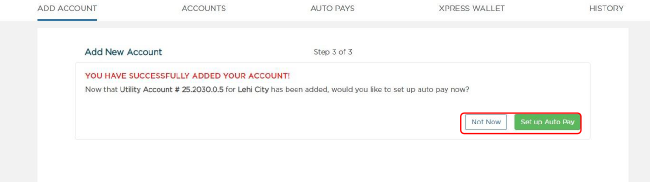
You will also be asked if you want to set up Auto Pay, or you can click Not Now (you can still set it up at a later time).
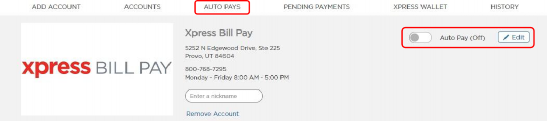
Once your bill is linked, it will be listed under the Accounts tab on the top menu bar.
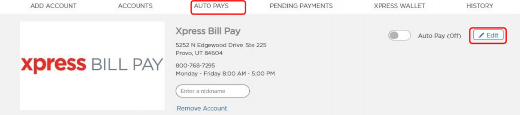
Auto Pay Setup
To set up Auto Pay, click on the Auto Pay toggle on the Accounts page. You can also click on the Auto Pays tab, and set it up from that screen.
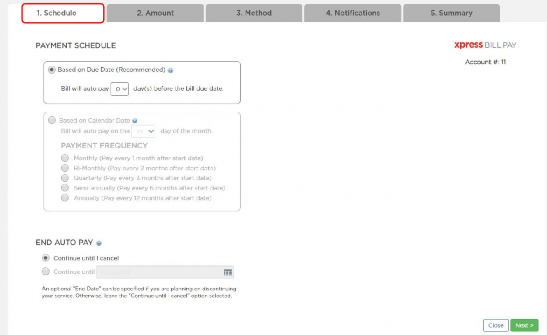
Part 1 of the Auto Pay setup is Schedule. On this screen, you can select the Auto Pay to run based on the due date (0-5 days before the due date). Having the Auto Pay run based on the due date can help ensure there are no accidental late payments.
You can also schedule the Auto Pay to run on a set day each month by clicking the Based on a Calendar Date option. This option can be scheduled to run monthly, bi-monthly, quarterly, semi-annually, or annually, after the start date.
You can also set up an end date for the Auto Pay (optional). Click Next.
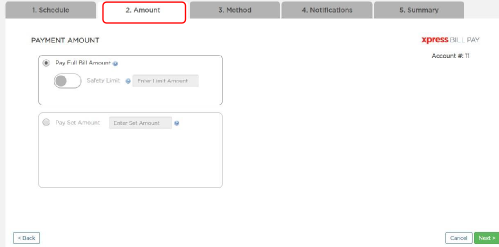
Part 2 of the Auto Pay setup is Amount. Here you can select Pay Full Bill Amount, which will pay the full amount due on the bill each time the Auto Pay runs. You can also set a Safety Limit amount. The Auto Pay will never run for more than the Safety Limit amount.
You can also select Pay Set Amount, if you want to pay the same amount each month. When this option is selected, the Auto Pay will run for that amount each month, even if no bill is due. Click Next.
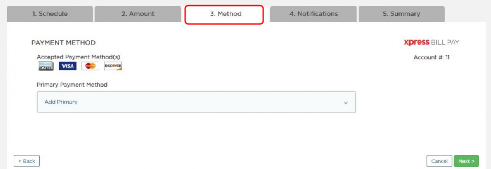
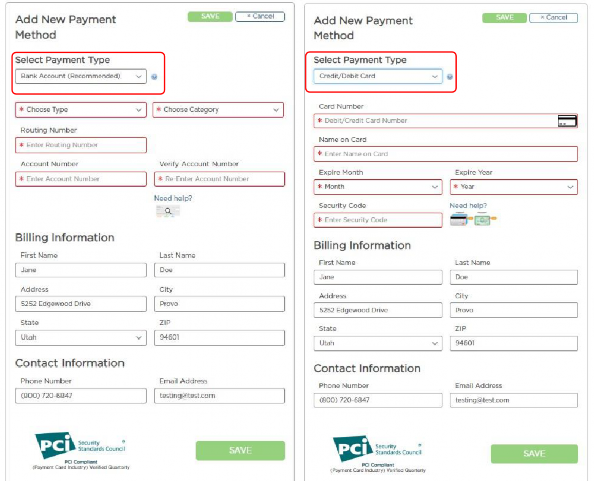
Part 3 of the Auto Pay setup is Method. This is where you specify your payment method for your Auto Pay. You can pay by bank account or debit/credit card.
Hit the drop-down box labelled Primary Payment Method and select either Add Primary Payment Method or select a previously saved payment method. You can also set up backup payment methods. Please note that credit/debit cards will need to be updated when you receive a new card for any reason, such as a new expiration date.
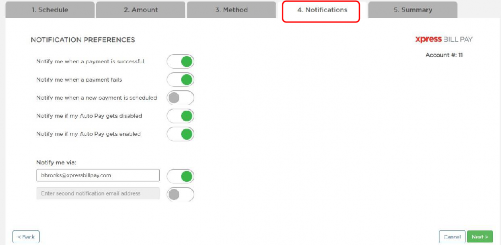
Step 4 of the Auto Pay setup is Notifications. This allows you to set up your notification preferences. To turn off/on specific notifications, click on the toggle buttons. You can also enter an additional email here if you need the Auto Pay notifications to go to multiple email addresses.
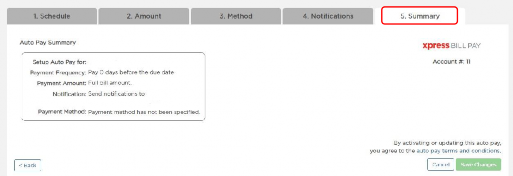
Part 5 is the Summary. Verify that the information is correct, then click Save Changes. Your Auto Pay will now be active, and run until you cancel it, or until the specified Auto Pay end date is reached. Please note that after 3 consecutive failed credit card payments, or one failed eCheck payment, the Auto Pay will automatically disable.
Once your Auto Pay is set up, you can edit any of your settings by clicking on the “Auto Pay” tab on the menu bar, and then select Edit. You can also disable the Auto Pay at any time.
Making a Payment
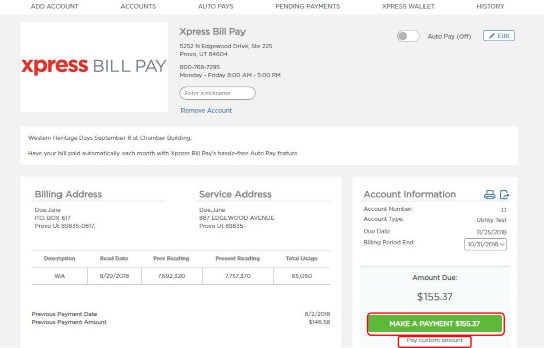
To make a payment, click on the green Make a Payment button. You can also click Pay Custom Amount if you want to make a payment for more or less than what is due on your bill. Please note that if you choose not to pay your full bill amount, you may be susceptible to late fees from your billing organization.
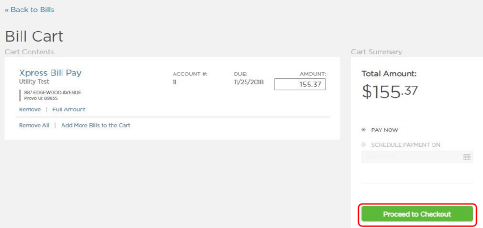
On the next screen, click Proceed to Checkout.
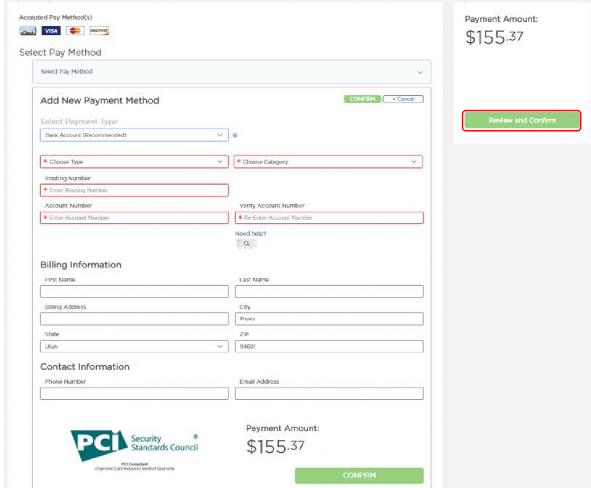
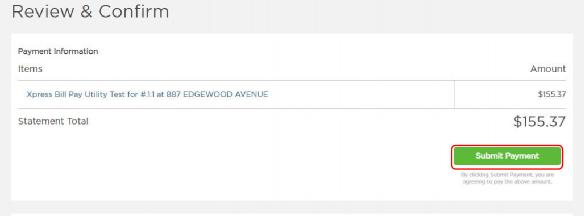
Then, enter a payment method. Once the payment method is entered, it will be encrypted and stored in the Xpress Wallet for future use. Then, click Review and Confirm.
One-Time Future Payments
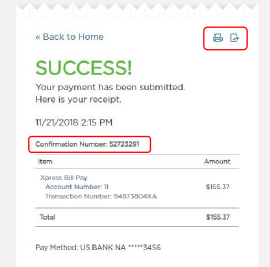
Click Submit Payment.
If your payment is successful, you will see a receipt page with a confirmation number. You can print or download this receipt for your records by clicking on the Print or Download icons in the top corner of the receipt. Payments made on Xpress Bill Pay are also kept on file under the History tab.
To schedule a one-time future payment, simply click on the Schedule Payment On option, rather than the Pay Now, and select a date for your payment. Then proceed with payment as noted above. Please note that if you schedule your future payment for a date after your due date, you will be subject to late fees.
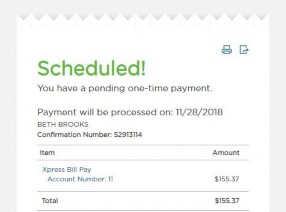
The pending payment receipt says Scheduled. You will receive notice on the date the payment processes via your email address.
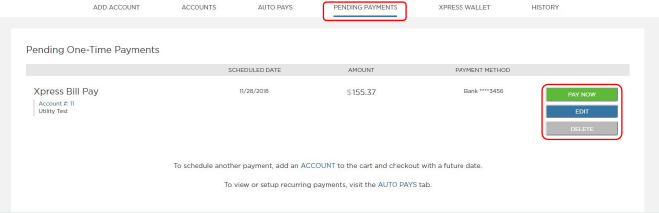
Once your payment is scheduled, a Pending Payments tab will appear on the main menu bar, which will show any pending payments, and allow you to Pay Now, Edit, or Delete your pending payments.
Linking Additional Accounts
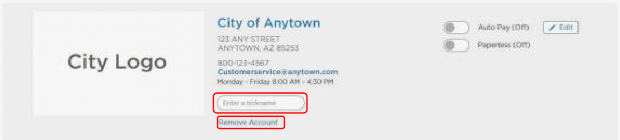
You can add additional bills to your account, as long as the organization is contracted with Xpress Bill Pay. The Nickname box near the top of the account page is an optional feature which allows you to nickname different accounts to help keep track of multiple bills. You can also remove the account from this page by clicking Remove Account.
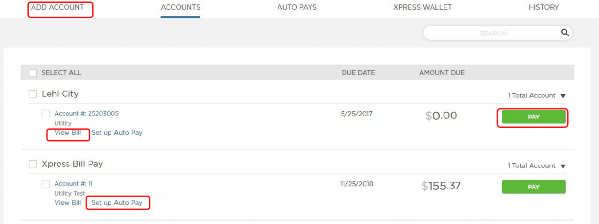
To add additional bills, go to the Add Account tab.
Locate your bill the same way you added your first account. When you have multiple bills linked, the main page after logging into your account will show a list of all your linked bills. To view your bill details from this page, click on the View Bill, button. Note that you can proceed to the payment screen from this page as well by clicking the green Pay button.
You can also get to Auto Pay setup from this page by clicking Set up Auto Pay.
Account Settings
To access the Account Settings, click on your name in the top right corner, next to the person icon. Then click Account Settings from the drop-down.

In your Account Settings, you can update your email, phone number, and address.
You can also update your notification preferences, and you can also change your password, remove your Xpress Bill Pay account (which deletes your account entirely), or remove any of your bills (which removes only the specified bill from your account).


Note that this information is private to your Xpress Bill Pay account, and updating your information in your Account Settings does not notify the city/billing organization of any changes.
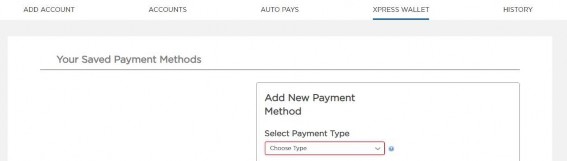
Xpress Wallet
The Xpress Wallet is a safe, secure storage for your saved payment methods. Once payment methods are entered and stored, they will be encrypted, and available to identify by the last four numbers of the card or bank account. Saving methods in your Xpress Wallet not only saves time when making future payments, it is safer than entering your payment method each time, as most credit card theft online happens at the point of entry.
You can edit any of your stored payment methods in the Xpress Wallet, and also delete any of your saved payment methods.
To save your payment method, first select the type from the drop-down menu and enter the required information. Once the form is filled out, click Save.
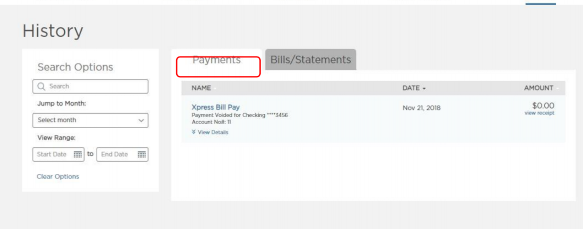
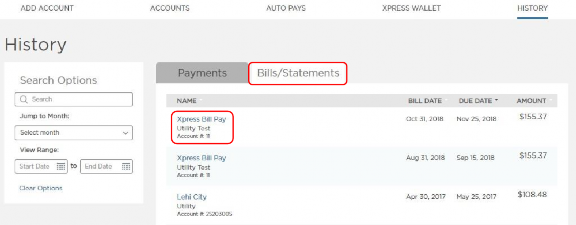
History
Under the History tab, you can view past payments made on Xpress Bill Pay under the Payments tab.
You can also view up to 24 months of your Bills/Statements from the billing organization. To narrow your search, you can fill in a date range under the Search Options. Previous statements can be downloaded and printed by clicking on the organization name.
Support
Our Support team is happy to assist you with anything you may need: support@xpressbillpay.com
Payment Center: 800-720-6847
Technical Support: 800-766-2350
When to Contact Xpress Bill Pay Support
- Help with account setup.
- Assistance with or questions about Auto Pay.
- Help making payments.
- You aren’t receiving Xpress Bill Pay email notifications.
- Any questions navigating www.xpressbillpay.com.
When to Contact the Billing Organization
Xpress Bill Pay is a third-party payment company. You may need to contact the city or utility company directly. We can also transfer you to the organization, if you don’t have their contact information.
- When cancelling your utility service.
- When updating your mailing or billing address.
- To add or remove a name from your utility account.
- When your bill is incorrect.
- To inquire regarding fees on your account.
- To request a refund or a void on a payment.